Recovering Data from a Failed Synology NAS
by Ganesh T S on August 22, 2014 6:00 AM ESTData Recovery - Evaluating Software & Hardware Options
Given the failure symptoms (and the low probability of all the four hard drives in the DS414j failing at the same time), I was cautiously optimistic of recovering the data from the drives. One option would have been to put the four drives in another DS414j (or another 4-bay Synology NAS unit) and hoping disk migration would work. However, with no access to such a unit, this option was quickly ruled out.
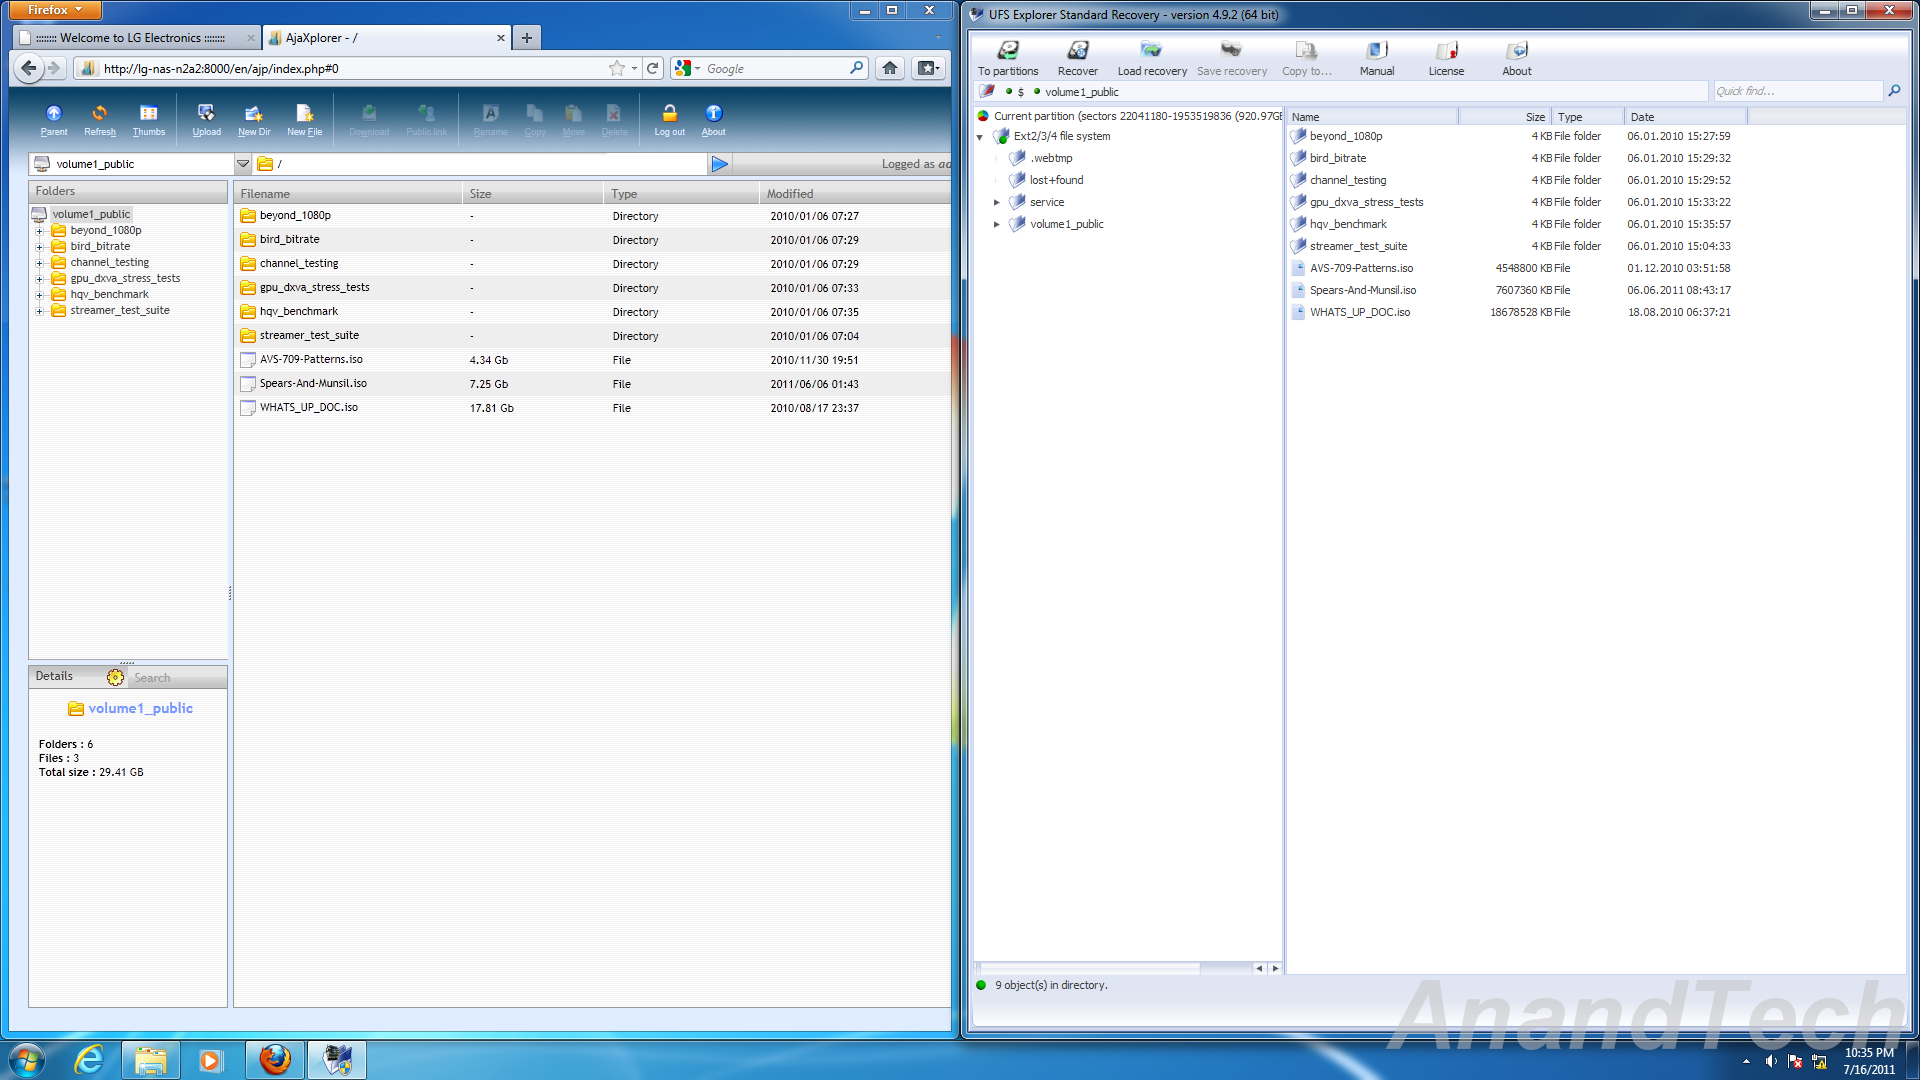
In many of our NAS reviews, I had seen readers ask questions about data recovery from the units using standard PCs. In the review of the LG N2A2 NAS, I had covered data recovery from a mdadm-based RAID-1 volume disk member using UFS Explorer Standard Recovery v4.9.2. Since then, I have tended to prefer open source software while keeping ease of use in mind.
Recovering RAID-1 Data using UFS Explorer Standard Recovery
Searching online for data recovery options for a failed Synology NAS didn't yield any particularly promising results for Windows users. From an open source perspective, Christophe Grenier's TestDisk appeared to be able to perform the task. However, with no full featured GUI and / or instructions for recovery in this particular case (4-disk RAID-5 volume), I fell back upon UFS Explorer for a quicker turn-around. My only worry was that I hadn't used standard RAID-5 while creating the volume, but Synology Hybrid RAID (SHR) with 1-disk fault tolerance. Though it was effectively RAID-5 with the 4x 2TB drives in the NAS, I wasn't completely sure whether the software would recognize the RAID volume.
Synology does have a FAQ entry covering this type of unfortunate event for users willing to work with Ubuntu. This involves booting Ubuntu on a PC with the drives connected, installing mdadm and using that to recognize the RAID volume created by the Synology NAS.

Data Recovery from Synology NAS Drives using Ubuntu
The pros and cons of the two data recovery software alternatives are summarized below:
-
Windows + UFS Explorer
- Pro - Intuitive and easy to use / minimal effort needed for users running Windows on the relevant PC
- Con - A licensed version of UFS Explorer costs around $200
-
Ubuntu + mdadm
- Pro - Free
- Con - Complicated for users without knowledge of Linux / users not comfortable with the command line
- Con - Synology's FAQ doesn't cover all possible scenarios
Evaluating the Hardware Options
UFS Explorer can take in disk images for RAID reconstruction. The hardware in my possession that came to mind immediately were our DAS testbed (the Asus Z97-PRO (Wi-Fi ac) in the Corsair Air 540 with two hot-swap bays configured) and the recently reviewed LaCie 2big Thunderbolt 2 / USB 3.0 12 TB DAS unit. My initial plan was to image the four drives one by one into the DAS and then load the images into UFS Explorer. I started the imaging of the first drive (using ODIN) and it indicated a run time of around 4.5 hours for the disk. After starting that process, I began to rummage through my parts closet and came upon the StarTech SATA duplicator / eSATA dock that we had reviewed back in 2011. Along with that, I also happened to get hold of a eSATA - SATA cable.
The Asus Z97-PRO (Wi-Fi ac) in our DAS testbed had two spare SATA slots (after using two for the hot swap bays and one each for the boot SSD and the Blu-ray drive). Now, it would have been possible for me bring out the two SATA ports and appropriate power cables from the other side of the Corsair Air 540 chassis to connect all the four drives simultaneously, but I had decided against it because of the difficulties arising due to the positioning of the SATA ports on the board (I would have considered had the ports been positioned vertically, but all six on the board are horizontal relative to the board surface). However, with the StarTech dock, I just had to connect the eSATA - SATA cable in one of the ports. There was no need to bring out the SATA power cables from the other side either (the dock had an external power supply).
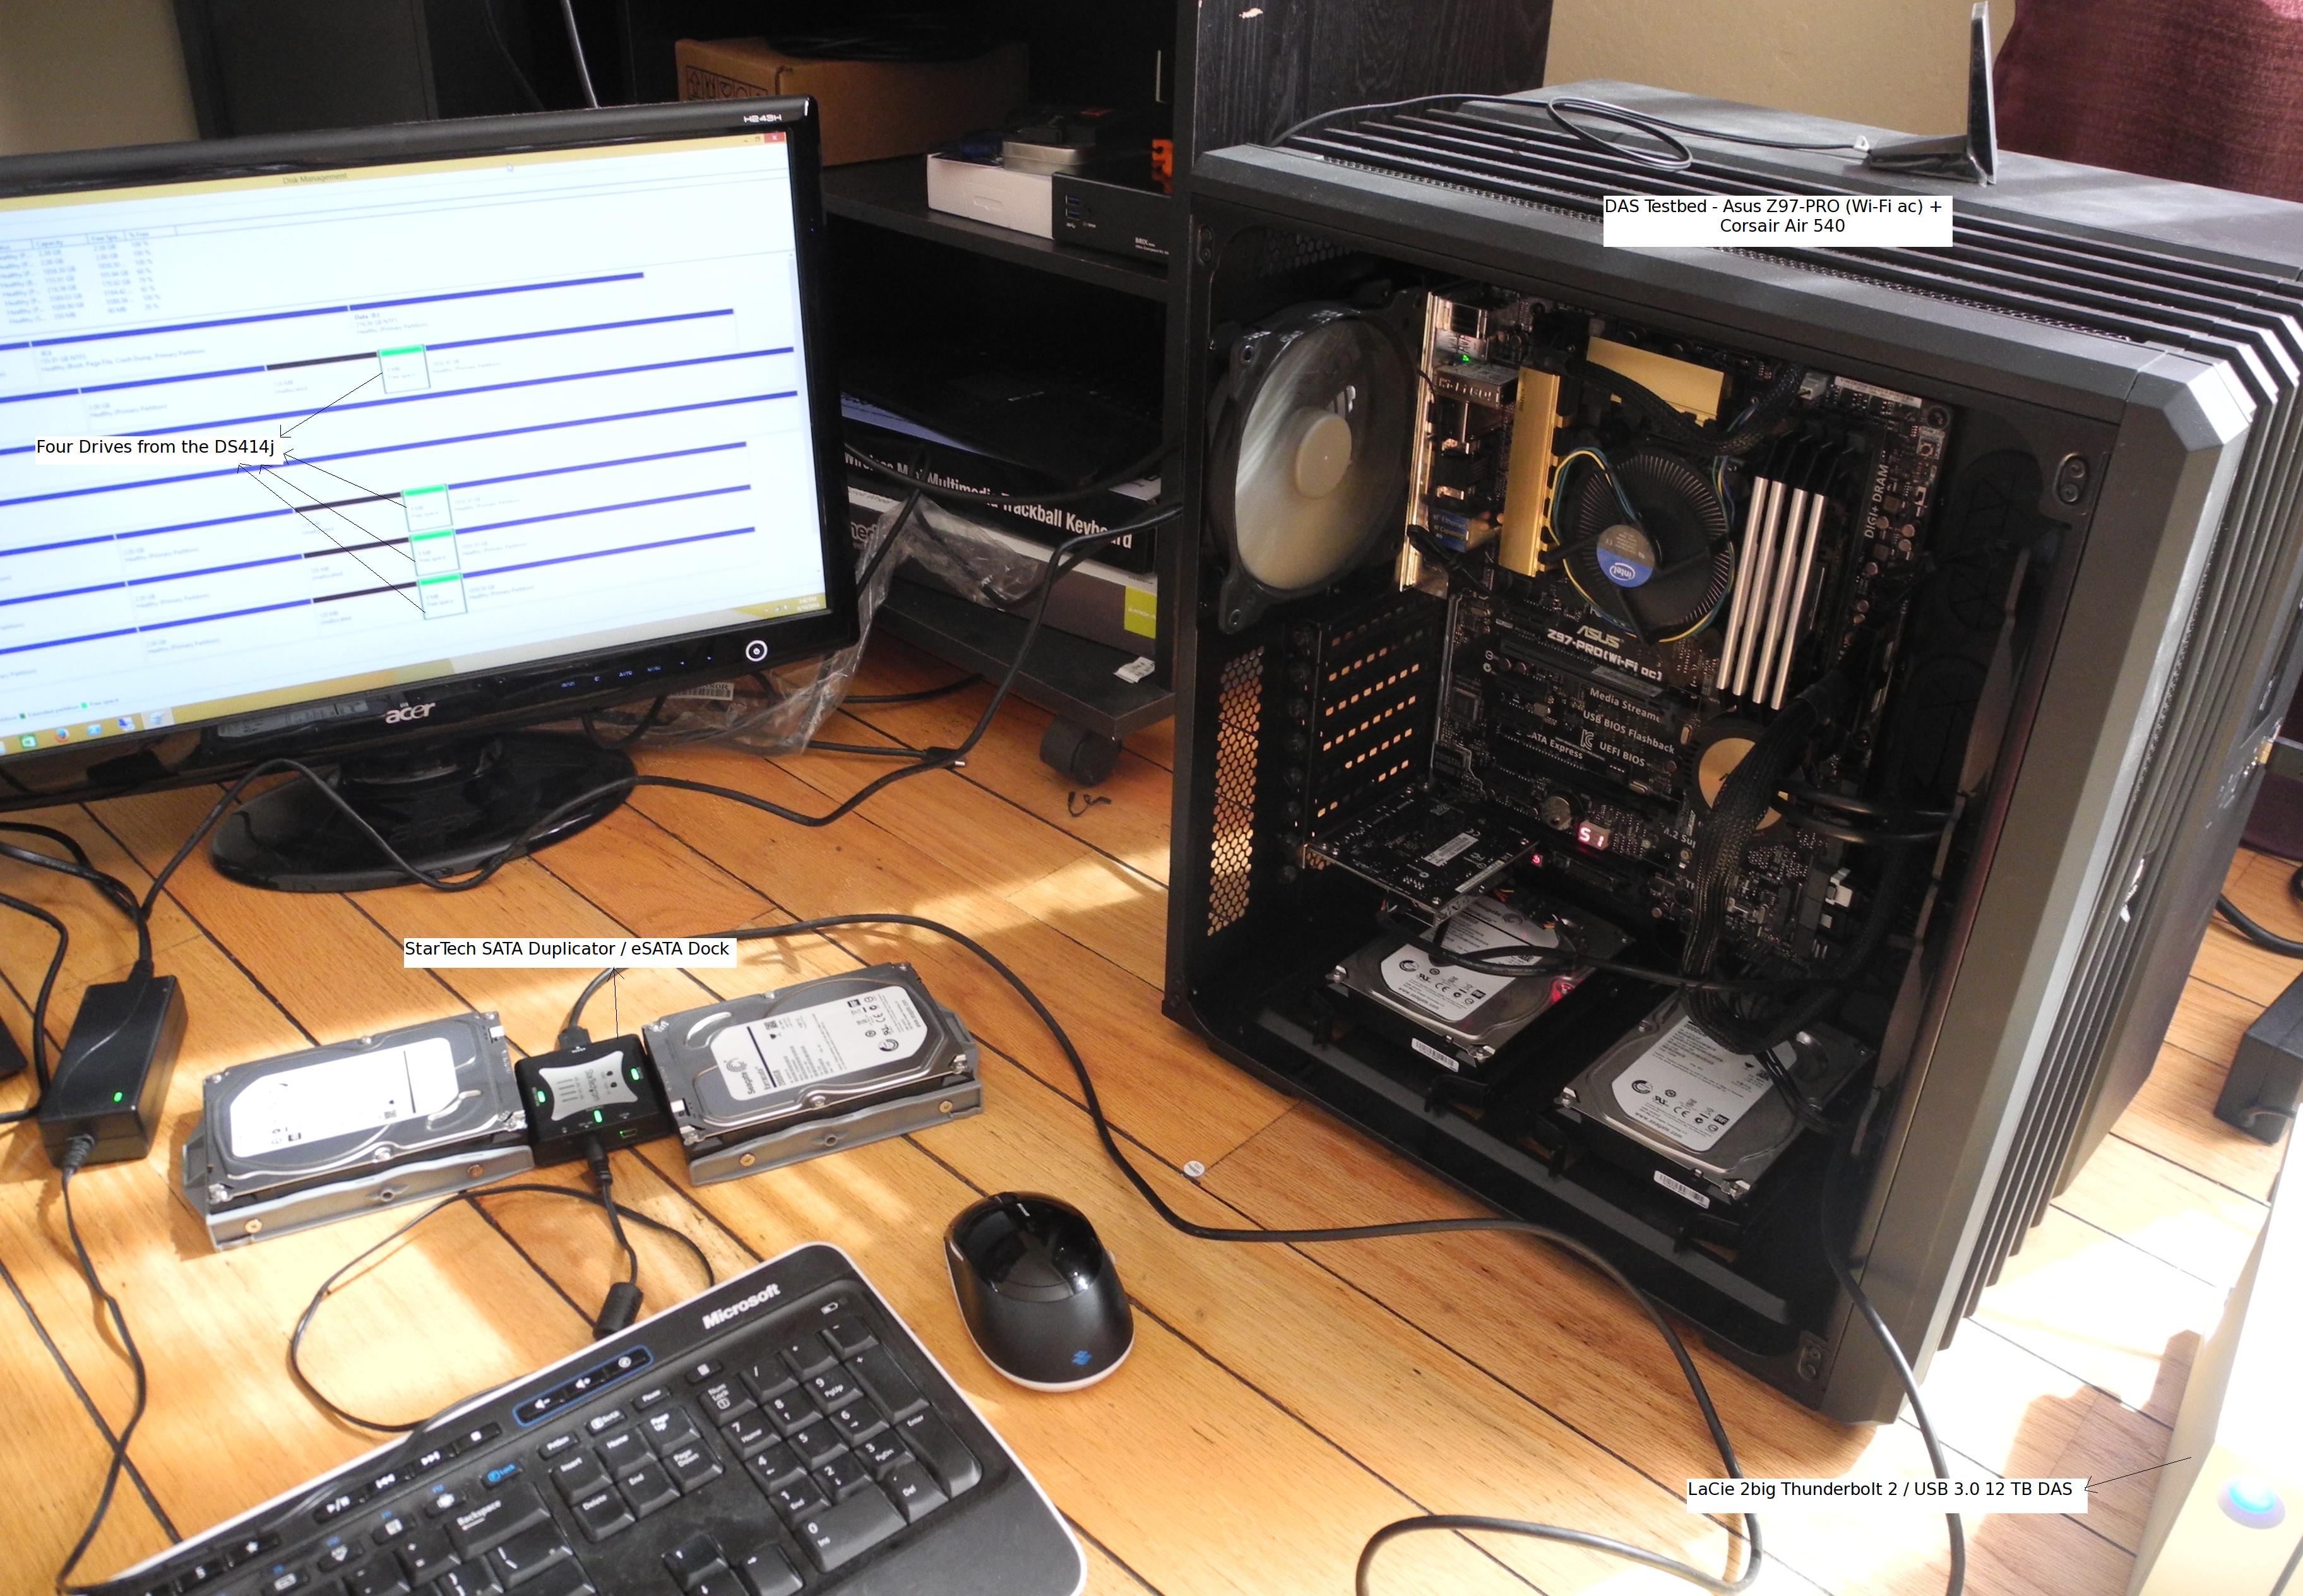
Click on image for component details
Our DAS testbed runs Windows with a 400 GB Seagate boot SSD as the only SATA drive permnanelty connected to it. I wasn't about to install Ubuntu / dual boot this machine for this unexpected scenario, but a live CD (as suggested in Synology's FAQ) with temporary mdadm installation was also not to my liking (in case I needed to reuse the setup / had to reboot in the process). Initially, I tried out a 'live CD with persistence' install on a USB drive. In the end, I decided to go with a portable installed system, which, unlike a persistent install, can be upgraded / updated without issues. I used a Corsair Voyager GT USB 3.0 128 GB thumb drive to create a 'Ubuntu-to-go' portable installation in which I installed mdadm and lvm2 manually.


55 Comments
View All Comments
Filiprino - Monday, August 25, 2014 - link
Well, if you have a service managing a RAID volume, that is, you have the raid volume mounted, obviously you have to first unmount it, so you have to stop the daemon...Synology's FAQ assumes that the RAID volume is not mounted and that no daemon has interacted with the RAID device first.
So I would not recommend Windows either. And probably you can get by with more complicated cases with Ubuntu than with Windows and UFS explorer.
Anyways, I'd use a GNU/Linux box with ZFS which as no write holes.
cyberguyz - Tuesday, August 26, 2014 - link
The best disaster recovery plan is backup, backup, backup. I've lost hundreds of gigabytes of data before so I know how valuable having a solid backup process is.My DS 412+ runs automated backups done to external drives twice a week (rotated on a monthly basis).
batatudo - Tuesday, September 16, 2014 - link
I have the Synology DS211j and last year I have some problem with one of the disk, at that moment I didn't have another disk to replace the failed one, so my priority was to backup the data from the good drive first. so I searched the internet and found a program called "File Scavenger 4.2" for windows, I was able to recover the data using that program, everything was very easy, I think that program is very similar to USB Explorer, is good to know we have several options to restore the data. After that event I also attached two external USB drive to my NAS and started making backups daily and weekly. Also I'm backing up the most important forlders to Amazon S3, is very cheap and best of all, you can access your data even through Internet Explorer or any other Amazon S3 client. Remember to make at least 3 backups, and one of them must be online or in another physical location.Midav - Thursday, June 16, 2016 - link
Only one month ago i had said just the same: I Have A RAID So My Data Is Backed Up. So i'm knowing about this topic almost evething now. This text is good, there are the most common RAID in it, but i can to advise the blog hetmanrecovery (com). Hetman Software real helped me with Data Recovery, and if you beginner in these questions, it'll help you too.mmuu296 - Sunday, January 21, 2018 - link
it is so interesting!!!!