MidiLand S4 7100 Plus 5.1 Speakers
by Jim Warren on January 31, 2001 12:43 AM EST- Posted in
- Smartphones
- Mobile
Features
The speakers that make up the S4 7100 plus are extremely straightforward. They are specifically designed to be paired with an external decoder; the amplifier does not even have a volume control. As a result, all of the features in the system stem from the ADS 3000 decoder unit paired with the system. The unit features an LCD screen that serves to display the variety of features.
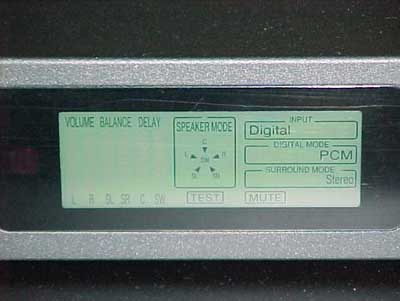
The right hand side of the display indicates the input and processing selections for the audio source. A selection between digital and analog is the top most indication. When digital is selected, a second option box appears for choosing the digital mode. This feature automatically selects itself based on the nature of the digital input signal. When Dolby Digital information is present, the unit indicates that it is operating in AC-3 mode. When the input is simply a stereo digital signal, the unit displays PCM (pulse code modulation) to correspond to the stereo signal.
The last selection on the right hand side of the unit is the surround mode. Again, the number of options depends on the nature of the input, as 5.1 surround is only available in the presence of an AC-3 input. The other options are conventional stereo mode, and also Dolby Pro Logic surround mode.
Pro Logic is based on a matrixing technique that encodes simplified surround info into a stereo audio track, so it is available when using both the stereo analog and stereo digital (PCM) inputs. It offers surround sound consisting of front left and right in addition to a mono surround output. In addition, the Pro Logic processing examines the left and right channels to determine what should fill a center channel, based on the concept that sounds within the vocal range equally panned to both left and right most likely should originate from the center.The center of the unit has a display that depicts the speaker arrangement and how the low frequencies are being routed. The speaker options, selected with the Speaker Mode button on the remote, are for stereo only, stereo plus center channel, stereo plus surround, or all five satellites engaged. The speakers that are engaged are indicated by having their abbreviation (C, L, R, SL, SR) illuminated.
The Bass button on the remote also determines how low frequencies are routed to the sub. In normal mode, all of the channels’ lowest frequencies are sent to the sub, which is important when using smaller drivers in the satellite. The user can choose to not route the bass frequencies to the sub from the front left and right satellites. This indicates that the crossover between satellites and sub might actually be performed in the control box instead of as a part of the speaker system itself. The low frequency routing is depicted via the arrows that point from the satellites’ abbreviations to the subwoofer.
The left hand side of the display consists of individual level displays for each of the six channels in the system. Three adjustments to the system stem from this area: volume, balance, and delay. These relative levels are all controlled via the volume adjustment buttons on the remote. Volume is the default adjustment controlled without selecting any options.
The Balance feature on the remote allows the relative levels of each of the six channels to be controlled relative to each other. Pressing the button multiple times cycles through the channels. A graphic representation of the relative levels appears in the metering area that corresponds to the same graphic used when adjusting volume.
The final adjustment in this area is the delay feature. The center and rear surround channels can be delayed in order to adjust for positioning. This would be useful if the distance from the rear speakers to the listener was much shorter than the distance to the front speakers, as delaying the rear channel would allow for the sound from all of the satellites to reach the listener at the exact same time. The same scenario would apply if the center channel (and the corresponding visual source) was closer to the listener than the front left and right channels; delay could sync all of these together. This is a feature mostly designed to tailor to personal preference; the system is not really large enough to justify needing such a feature.
The final options housed in the decoder box are a couple of house keeping features, in addition to a mute function. There is a test sequence that plays noise to each of the channels to check that they are connected correctly. There is also a reset function that zeroes out the delay, balance, and speaker selections. One quick warning is that it also resets the volume level to a relatively loud level. The final option is Pro Logic auto on, which allows the unit to automatically engage Pro Logic for appropriate sources. Though the feature is well intentioned, it is often better to just control the surround mode directly; that way it’s possible to tell what should be heard, not just what the unit thinks should be.
After working through all of the features, the system is ready to go. Let’s sit back, listen, and see how they perform.


0 Comments
View All Comments